

Barn doors have quickly become a hot trend in Australian homes – and for good reason. These rustic yet modern sliding doors offer a perfect blend of form and function, saving space while adding character to any room.
If you’re an Aussie homeowner considering a barn door, this comprehensive guide will walk you through everything you need to know, from choosing the right barn door kits to installation tips, design ideas, cost considerations, and more. By the end, you’ll see how a barn door can transform your space and exactly how to make it happen.
NOTE: All images in this article come from real customers of Barn Door Outlet, a local Australian barn door supplier
Why Choose a Barn Door for Your Home?
-
Space-Saving Solution: Unlike a traditional hinged door, a barn door slides along the wall on a track. This means no swing arc eating up floor space – a massive space saver, perfect for small rooms, ensuites or pantry entrances where a regular door might be impractical. It’s an ideal sliding door solution for open-plan layouts too, letting you close off areas when needed and open them up for flow.

-
Stylish Visual Impact: Barn doors make a great visual statement in your interior. Whether you go for a raw timber finish that stands out as a feature or paint it to blend in with your wall, a barn door can either wow as a focal point or complement your décor subtly. From modern minimalist to rustic farmhouses, barn doors come in designs to suit any interior style. They’re not just for country homes – barn doors can also be sleek and contemporary.
-
Versatility: With endless design options (as we’ll explore below), barn doors are incredibly versatile. You can use a sliding barn door for bedrooms, bathrooms, closets, home offices, or as decorative room dividers. You can even mount a standard door with barn door hardware to get the look. Double barn doors can cover wide openings, and wall-mounted sliding doors can cover an entryway without major renovations (no need to tear open a wall as with pocket doors).
-
DIY-Friendly Upgrade: Installing a barn door is often easier than people think – especially with ready-made kits. It’s a home improvement project that many DIY enthusiasts can tackle in a day or two. Unlike installing a pocket sliding door (which requires carpentry to recess the door), a barn door kit mounts on the wall surface, making it a relatively straightforward retrofit. (We’ll provide installation tips later in this guide.)
-
Home Value & Appeal: Because they’re so popular and stylish, a well-chosen barn door can even add to your home’s appeal. It’s a simple upgrade that gives a custom, designer touch to your interior – something prospective buyers or guests will notice. The barn door trend shows no sign of fading; designers say these convenient and eye-catching doors are here to stay in modern interiors.
Note: One limitation to keep in mind is that barn doors don’t seal as tightly as standard hinged doors. There’s typically a gap between the door and the wall, so noise and light can pass through more easily.
For a bedroom or media room where sound privacy is critical, this might be a consideration. However, for many applications like living areas, studies, or ensuite bathrooms, the benefits of a barn door often outweigh this minor drawback.

Barn Door Kits 101: What’s Included and How to Choose
If you’re ready to add a barn door, going with a barn door kit is a smart move – especially for DIY homeowners. But what exactly is a barn door kit? In short, it’s a package that typically includes everything you need to install one sliding barn door, such as the door itself and all the necessary hardware. Here’s what to know:
-
Door Panel: The kit will include the door slab (or pair of doors for double kits). Many kits in Australia come as flat-packed, unassembled door panels to keep shipping easy. Don’t worry – assembling the door is usually just a matter of joining pre-cut pieces using the provided screws and instructions. Door panels come in various materials and finishes (more on design options in the next section). Make sure to choose the right size: as a rule of thumb, the door should be slightly wider and taller than the opening it will cover (typically 2–5 cm overlap on each side) for proper coverage and privacy. Standard interior barn door sizes in Australia are around 2100 mm high by 820–1200 mm wide, but always measure your doorway first.
-
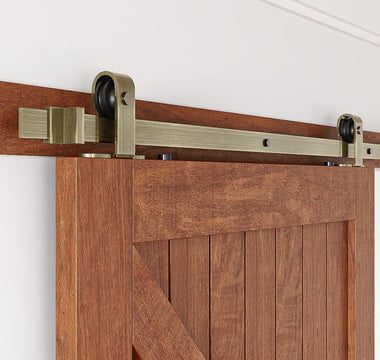
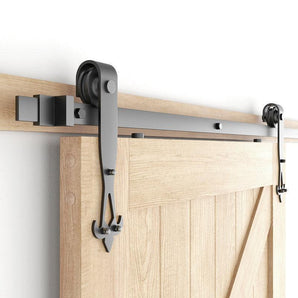
Sliding Door Hardware: Every barn door needs a track and rollers to slide on. A quality barn door kit will include a hardware set consisting of a horizontal track (usually metal) that mounts above the doorway, and rollers (hangers) that attach to the door and roll along the track. It will also include wall spacers (to stand the track off the wall, allowing the door to glide past trim), door stops for the track ends, and anti-jump brackets to keep the door securely on the track. A floor guide is another small but important piece – this is installed on the floor (or wall by the floor) to keep the door from swinging out from the wall at the bottom. Essentially, a good kit provides all the necessary screws, bolts and bits so you don’t have to run to the hardware store mid-project. Always verify what’s included; most kits will list all components.
-
Handle and Accessories: Some barn door kits also include a handle or pull for the door, while others let you purchase the handle style of your choice separately. You can find handles in styles from black iron pulls to modern stainless steel bars to match your decor. If you’re installing a barn door on a bathroom or bedroom, you might want a locking latch mechanism as well – these are often sold as add-ons (e.g. a simple hook latch or a privacy lock designed for sliding doors). Consider if the kit offers a compatible lock if privacy is needed.
-
Single Door vs. Double Door Kits: Do you have a wide opening (like between a living room and dining room)? If so, you might need double barn doors, which meet in the middle. There are two ways to do double doors: bi-parting doors (two doors on one track that slide together and apart) or bypass doors (one door slides behind the other on a double-layer track). If you want to cover a large doorway without building a wall, double barn door kits are ideal – just ensure you get the appropriate hardware (a bypass hardware kit differs from a standard single-door kit). An oversized or heavier door will also require heavier-duty hardware, so check the weight ratings on the kit.
-
Quality Matters: Look for kits made of durable materials. For example, steel tracks and rollers will support a heavy solid wood door; many good kits use powder-coated steel which resists rust and looks great in black or other finishes. The door material (MDF vs solid timber, etc.) will be discussed shortly, but ensure the door is robust and not prone to warping. If buying from a specialty supplier, check if the kit meets Australian standards or comes with a warranty. (Barn Door Outlet, for instance, provides a 3-year warranty on their doors and 10 years on hardware, showing confidence in their quality.) Reading reviews or asking the supplier about weight capacity and hardware durability can save you headaches later.
Choosing a kit comes down to your needs: your opening size, style preference, and budget. The good news is that Australian homeowners have plenty of options. You can find basic barn door kits at big-box stores like Bunnings, but you’ll find an even wider selection with specialist retailers. For example, Barn Door Outlet (based in Melbourne) is an affordable online barn door and hardware specialist that stocks everything you need – from pinewood barn doors and DIY unfinished doors to sliding door hardware, tracks, handles, and locks – and even offers customisation. Going with a one-stop specialist can ensure all your components are compatible, and you can get advice on the best solutions for your space. Now, let’s look at the fun part: design options!

Barn Door Designs and Materials: Finding the Perfect Style
One of the big appeals of barn doors is the huge range of designs, materials, and finishes available. Whether your home is modern or traditional, you can likely find (or custom-build) a barn door that fits right in. Here are some key considerations and popular options for barn door style:
-
Material Choices – Wood, MDF, Metal, and More: The material of your barn door affects both its look and its weight. The classic choice is solid wood – like pine, oak, or cedar – which gives a warm, authentic feel. Solid timber doors can be left with a natural stain for a rustic vibe or painted for a contemporary look. Keep in mind, that solid wood is heavy (especially large doors) but very sturdy. For a more budget-friendly option, many kits use MDF or engineered wood with a veneer or PVC finish. MDF barn doors are lighter and often come pre-finished in colours like white or grey for a smooth, modern appearance. They resist warping and are cost-effective, though not as hefty as solid wood. On the other end of the spectrum, you might even consider a metal-framed barn door or all-metal door for an industrial look – these are lighter than solid wood and can be powder-coated in various colours. Some modern barn doors combine materials like wood doors with frosted glass panels, or metal-framed glass barn doors that resemble French doors. Glass inserts (clear, frosted, or reeded/textured glass) are fantastic for allowing light to pass between rooms while still providing separation. Just ensure any glass in an internal door is tempered for safety.
-
Style and Panel Design: “Barn door” originally brings to mind the traditional rustic cross-brace design – for example, the classic X brace or Z brace pattern on a wooden door (often seen in farmhouse interiors). Those designs are still very popular for a country or rustic chic look. However, today you’ll find an array of styles far beyond the barnyard. Some popular barn door styles include:
-
Minimalist Slab: A plain, flat panel door with no adornments, for a clean modern or Scandinavian look. This could be a sleek painted MDF door that blends with a contemporary interior.
-
Panelled or Shaker Style: Doors with recessed panels or a simple Shaker-style design add a touch of classic elegance – great for Hamptons or transitional decor.
-
Chevron or Herringbone Patterns: For something unique, consider a door with a pattern like a chevron (“V”) or herringbone design in the wood panels. A fishbone pattern barn door, for example, creates a strikingly modern statement (Barn Door Outlet offers a “Fish Bone” design in white that’s quite on-trend).
-
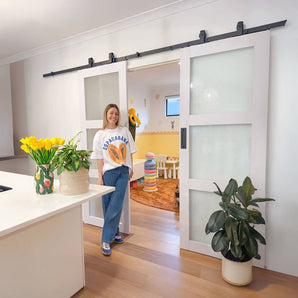
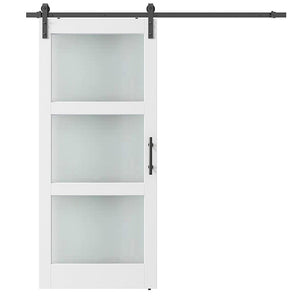
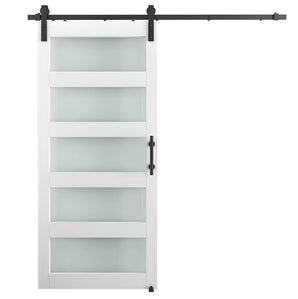
Barn Doors with Glass: As mentioned, doors that incorporate glass can look stunning. Options range from one or two small windows at the top to half-glass doors, to full-length French-door styles. Frosted or reeded glass is popular for letting light through while maintaining privacy. These suit contemporary and industrial interiors and work well for home offices or as hall dividers where you want the light to flow.
-
Reclaimed or Distressed Wood: If you love the rustic charm, some providers offer barn doors made from reclaimed timber or distressed paint finishes for a weathered look. Each reclaimed wood door has a unique character – perfect for adding warmth to a modern space or enhancing a vintage aesthetic.
-
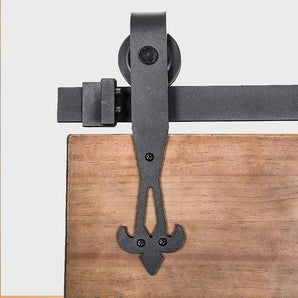
Custom Creations: The sky is the limit if you go custom – you could have a mural or chalkboard painted on a door (great for a pantry or kids’ playroom door), mirrors added (to double as a full-length mirror door for a closet), or even creative shapes. Custom hardware (like horseshoe-shaped hangers or decorative strap hinges) can further personalize the look.
-
-
Finishes and Color: The finish of your barn door helps tie it into your room’s colour scheme. Stained natural wood tones (teak, walnut, oak etc.) bring warmth and showcase the grain. Painted finishes are extremely popular too – crisp white barn doors are a staple in modern coastal or Hamptons-style homes, while trendy hues like grey and black can provide a dramatic contrast on a light wall (Barn Door Outlet notes that grey and white barn doors are among their popular offerings in Australia). If you prefer a pop of colour, you can always paint an unfinished timber door in any shade you like. Just use a good primer and paint or a wood stain/sealer for lasting results. Don’t forget the hardware finish: most barn door kits come with black powder-coated hardware (a versatile choice that suits most styles). But you can also find hardware in stainless steel (for a sleek silver look), bronze, brass/gold, or even paint colours. Matching the hardware finish to other fixtures in your room (like black light fixtures or chrome handles) can create a cohesive look.

When selecting your barn door design, consider the overall style of your home and the statement you want to make. A barn door can either blend in or stand out. For example, painting a barn door the same colour as your wall can make it almost disappear and simply add texture, whereas choosing a contrasting colour or a bold wood grain will make it an art piece on its own. Browse inspiration photos (check out online galleries – Barn Door Outlet’s customer gallery is a great place to see different barn doors in real Aussie homes) to decide what appeals to you. Remember, it’s about enhancing your space’s look while adding the convenience of a sliding door.
How to Install a Barn Door: DIY Tips for Australian Homeowners
One of the best parts about barn door kits is that installation can be a doable DIY project. If you’re moderately handy with tools, you can likely install a barn door over a weekend (or even in an afternoon, if everything goes smoothly). Below are step-by-step tips to help you install your new sliding barn door. Even if you plan to hire a tradie, it’s good to know the basic process:
-
Measure Your Opening and Door: Before you begin, double-check all your measurements. A common recommendation is that the barn door should be at least a few centimetres larger than the opening in width and height (for example, a door 2200mm high for a 2100mm opening, and 900mm wide for an 800mm opening). This ensures good coverage. Also, mark out the wall space next to the opening – you’ll need at least the door’s width in clear wall space for the door to slide open fully. (If you have light switches, power outlets, or vents on that section of wall, consider how the door will cover them when open.) Finally, check you have enough clearance from the ceiling for the door and track; most kits need a certain gap above the doorway (often around 150-200mm) for the track and rollers.
-
Find a Solid Mounting Surface: The track will bear the weight of the door, so it must be securely mounted. Ideally, locate the wall studs above the doorway and plan to attach the track to the studs. If the studs don’t line up with where the track holes need to be, you have a couple of options: use heavy-duty hollow wall anchors for the lag bolts, or mount a wooden header board first. A header is typically a long timber board (e.g. a length of hardwood or pine) that you bolt securely into multiple studs above the door, and then you mount the barn door track onto that board. This spreads the load and ensures a solid anchor. In Australian homes with plasterboard on timber framing, a header board is a common solution if stud positions aren’t ideal. If you’re fixing masonry (brick or concrete wall), use appropriate masonry plugs and screws. Ensure the track (or header) is perfectly level when marking holes.
-
Install the Track: Attach any spacers to the track as instructed (spacers hold the track off the wall to allow the door to hang freely). With a helper holding one end, line up the track above the door frame at the determined height. Use a spirit level to get it straight. Mark the drilling points for the bolts. Drill the holes (into studs, anchors, or pre-mounted header board), then secure the track to the wall with the provided bolts. Tip: Most tracks are made to be slightly longer than the door width – for example, a 2-meter door might come with a 2m track, or sometimes you might use a track that’s double the door width for full clearance. If your track comes in two pieces, be sure to join them tightly in the middle so the door rolls smoothly across the seam. Install the end stoppers on the track so the door won’t roll off either end.
-
Attach Rollers to the Door: Now prepare the door itself. The kit’s instructions will show where to attach the hanger rollers on the door’s top. Measure the specified distance in from each edge of the door’s top and drill pilot holes for the hanger bolts. Attach the roller hangers firmly to the door. Also, this is a good time to attach any other hardware to the door: if your door has a floor guide groove (some doors have a groove along the bottom for a floor guide), ensure it’s on the correct side, and attach the guide piece to the bottom if required. If using a soft-close mechanism (an optional device that catches the door and gently pulls it closed), you might need to attach small actuators to the top of the door now as well, per instructions.
-
Hang the Door on the Track: This step benefits from an extra pair of hands! With the door’s rollers attached, lift the door and carefully set the rollers onto the track from one end. Slide the door to roughly the middle of the track. Congratulations – it’s now hanging! Check that the door slides smoothly. If you installed a header board, confirm that the door covers the doorway as intended (overlaps the frame enough). At this point, also attach the anti-jump brackets or clips usually provided in the kit – these are small L-shaped clips that screw into the top of the door edge or the rollers and overlap the track, preventing the door from popping off the track if jostled. It’s a small safety feature but important, especially if you have kids who might tug on the door.
-
Install the Floor Guide: With the door hanging, you can now position the floor guide. Typically, a floor guide is a tiny U-shaped bracket that sticks up an inch or two, which the door slides through at the bottom. Adjust the guide so it sits in the middle of the door’s bottom edge when the door is closed. It will usually be screwed into the floor (for concrete or tile floors you may need special anchors; for timber floors just use wood screws). Some guides can be wall-mounted to the baseboard instead, which avoids drilling into the floor. In any case, once installed, the guide will keep the door from swinging outwards and will make the sliding motion more stable.
-
Final Touches – Handle and Soft Close: The last steps are to attach the handle and any lock/latch to your door. Handles are often installed at standard door handle height (around 1000mm from the floor, centred on the door’s edge or face). If your handle is a pull on the outside, you might also have a flush pull on the inside so the door can slide fully open without a knob protruding on the back side. Install according to the template or instructions provided. If your kit comes with a soft-close damper, this device usually mounts inside the track and catches a peg on the door to slow it down gently. Follow the manufacturer’s directions – typically you’ll slide the damper into the track and screw it in place at the appropriate point so that it engages in the last few inches of travel. Adjust the soft close and stops as needed so the door closes and opens to the desired positions without banging.
-
Test It Out: Now slide your door open and closed several times. It should roll smoothly and quietly. (High-quality kits often have nylon-coated wheels for quiet operation – you can appreciate the difference!). If it’s rubbing or not sliding easily, check that the track is level and straight. Tighten any loose bolts. Make sure the floor guide is properly aligned with the door groove. After a bit of fine-tuning, your barn door should glide effortlessly. Step back and admire your work – you’ve just installed a barn door!
Most barn door kit installations are straightforward with the provided instructions. If you run into a snag or the process is outside your comfort zone, don’t hesitate to call a professional. In Australia, a typical handyman or carpenter might charge on the order of a few hundred dollars for a standard barn door install (around $400 for a standard door, according to one Brisbane installer). Given that the door hardware itself is designed for DIY, many homeowners successfully do it themselves – but there’s no shame in getting expert help to ensure it’s done perfectly, especially for larger or more complex double-door setups.
How Much Do Barn Door Kits Cost in Australia?
Budget is an important factor in any home improvement project. The cost of barn doors can vary widely based on the style, size, and materials you choose. Here we’ll break down the typical costs for barn door kits in Australia and what factors influence the price:

-
Barn Door Panel Costs: For a single standard-size interior barn door (around 2.1m x 0.9m), prices can start from as low as $300-$400 AUD for a basic design. For instance, plain barn door panels at large retailers might start around $289 for an unfinished door slab. Mid-range options, such as pre-finished MDF doors in popular colours or simple farmhouse designs, often fall in the $400-$700 range (some examples on Barn Door Outlet are around $450-$499 for a 2135x820mm pre-finished door). High-end or custom barn doors made of premium hardwood, featuring glass inserts, or intricate designs can cost $800 and up per door. Oversized doors (taller or wider than standard) will also cost more due to extra material and potentially thicker construction to prevent warping. And if you’re going for a double-door setup, expect roughly double the cost since you’ll need two doors (though sometimes double-door kits come at a slight discount for the pair).
-
Hardware Kit Costs: Don’t forget to account for the sliding hardware if it’s not included with the door. Many kits sold by specialty stores do bundle the door with hardware, but if you buy them separately, a quality barn door hardware kit (track, rollers, etc.) typically ranges from about $150 to $300. You can find basic hardware kits on the lower end of that range – for example, one DIYer noted getting a black barn door hardware kit for around $232 from a big-box store, which held up well over years of use. Designer or heavy-duty hardware (longer tracks, soft-close attachments, stainless steel finishes, etc.) will trend toward the higher end or beyond. Keep in mind, the length of the track you need can affect price too – very wide openings requiring extra-long tracks or bypass systems will cost more than a standard single-door track setup.
-
Complete Kit Packages: Some retailers offer complete barn door packages that include the door, hardware, handle, and all accessories together. Buying as a bundle can sometimes save you money compared to sourcing each piece separately. For example, DIY barn door packages from specialist suppliers often advertise a better price for the whole set. Always check what’s included so you’re comparing apples to apples. An all-inclusive kit in a standard size might be, say, $600-$800 for mid-range styles – which, considering it covers door + hardware + handle, can be good value.

-
Customization and Extras: If you opt for custom options (like a special colour finish, custom dimensions, or an unusual design), the price will reflect those extras. Custom barn doors made to order by local craftsmen or specialized companies can easily exceed $1000 due to the labour and bespoke nature. Also, factor in any additional accessories you might want: a decorative handle upgrade, a lock ($50-$100 for a good quality sliding door privacy lock), or a soft-close attachment (often $50-$80 if not included). These can add to the total but may be worth it for functionality and look.
-
Installation Costs: As mentioned earlier, hiring someone to install your barn door will incur labour charges. In metro areas of Australia, installing one barn door might cost roughly $300-$500 in labour, depending on the complexity and local rates. You can save this cost by installing it yourself with a bit of effort. If you do hire a professional, it’s wise to get a few quotes. Sometimes the retailer can recommend installers or offer installation as a service for an added fee.
In summary, for a typical project with a standard door and hardware, budget around $500 to $800 AUD total if you’re doing it DIY (door + hardware kit + handle). This would get you a good quality kit and a stylish door. If you’re aiming for a premium custom look or need double doors, that could be $1000-$1500 or more. There are certainly ways to economize – for example, some renovators repurpose old doors or buy second-hand and just purchase a hardware kit, bringing the cost down. One Australian homeowner noted they sourced a couple of vintage doors from a wrecker and a track kit from Bunnings, completing a barn door project for about $1000 all up. The approach you choose will depend on your budget, time, and the exact style you want.
Pro Tip: Keep an eye out for sales on barn door kits. Because barn doors remain popular, retailers occasionally run promotions. Barn Door Outlet, for instance, often has a Sale section (at the time of writing, some door models were marked down from $600 to about $450). Scoring a discount can make your dream barn door project even more affordable. And even at full price, remember that a barn door is a long-term feature – a quality door will last for many years and continue to be a conversation piece in your home.
Transform Your Space with Barn Door Style
Installing a barn door is a fantastic way to elevate the style and functionality of your home. You’ve learned how these sliding barn doors not only save space but also add a unique design element that can set your home apart. By choosing the right barn door kit and style to suit your decor, and following best practices for installation, you can enjoy the benefits of this trend in your own home. From cozy farmhouses in the countryside to sleek modern apartments in the city, barn doors are making their mark across Australia’s interiors
– now it’s your turn to get on board.
When you’re ready to take the next step, be sure to explore the offerings of reputable Australian suppliers. For example, Barn Door Outlet – Australia’s leading sliding barn door specialist – provides “Aussie-standard” products at affordable prices and ships barn door kits Australia-wide. Whether you need a rustic timber door for a cottage or a chic glass-panel barn door for a contemporary space, they stock a wide range (and even custom options) to help you find the perfect fit. Working with a specialized retailer can give you access to expert advice and a one-stop shop for all the components, making the process smooth from start to finish.
In conclusion, adding a barn door can be one of the most rewarding DIY updates you do in your home. It’s amazing how a simple sliding door can completely transform the look and utility of a room. So go ahead – pick out a style you love, grab that barn door kit, and watch your home gain a fresh new focal point that is equal parts practical and beautiful. With the information and tips from this guide, you’re well-equipped to make your barn door project a success. Happy upgrading!
